I found a decent solution for taking the web with me. I've been typing with my thumbs on an iPod Touch for a few months now, and while the iPhone has the web anywhere there's a signal, I opted to keep my existing "dumb" phone and settle for the near-ubiquity of Wi-Fi.
Back when my old Pocket PC still worked, Opera Mobile had a nice feature where you could save web pages, and reload them offline. I got excited when I found that the new mobile Google Chrome app had a similar feature called Chrome to Mobile. With a desktop Chrome extension, you could send a URL to your mobile device and even attach a downloadable offline copy. When I finally tried it out, it was a bit disappointing, since pulling up a page requires you to be logged into your Google account, which in turn requires an Internet connection. Which kind of defeats the purpose of an offline copy, right?
But today I got connected and tried putting it through its paces. The first thing I noticed was "Page 1 of 4" hovering over the page, and slightly different fonts. I checked the "Omnibox" address bar, and sure enough I was viewing a PDF rendering of the web page! But Chrome doesn't have Safari's integration with iBooks, so there was no option to send it there.
However, I found that it is possible to "star" (bookmark) the page, with its chrome://chrometodevice/blah.pdf URI and all. And that bookmark still works when you take it offline. It's still an extra step that you have to remember to take, but when you're sitting around on a movie set, up in the Adirondacks, with no signal and not much to do, it can be handy. Hopefully soon Chrome will allow browsing the list of PDF stored on the device without being online, but for now I'll take what I can get.
Friday, August 17, 2012
Saturday, May 12, 2012
Get the chalk! Always be closing!
My wife's theatre group, Mostly Harmless, is performing Glengarry Glen Ross, at Steamer 10 Theatre in Albany. Their last performance is tonight at 8pm. Come see the show, it's a great look at the diversity of the art of acting - it's more than just musicals and feeling good. There's a lot of intensity in this show. 8pm at 500 Western Ave, Albany NY
Tuesday, November 22, 2011
When a JUnit Report Has Too Many Files
When a junitreport generated by Ant starts failing with a "Too many open files" error, it's time to update your XSLT processor.
I recently found this out at work. I maintain my project's nightly test suite, and the email script that automatically lets the team know when a build fails. Lately it had been failing every night. When I would scroll down to the bottom of the log file, the error would have happened after running all of the unit tests. I did some experiments and figured out that the system would trigger the error when it had opened 1024 files. It seemed strange, because Ant uses Apache Xalan for XSLT tasks including junitreport, and the Xalan documentation that I had on hand claimed that the redirect:write extension tag used by the junitreport template would automatically close the open file handles. Another test using a recursive xsl:call-template proved that it was in fact leaving the files open forever.
The fix took a few steps, and gave me a lot of insight into how junitreport works under the hood. It starts by concatenating all of the individual TEST-*.xml files together into one big TESTS-TestSuites.xml file. The report subtag inside the junitreport tag is completely optional. If you leave the report tag out, all you'll get is this master XML file. The report tag then triggers the XSLT processing of the master XML file using one of Ant's templates in the ANT_HOME/etc directory, e.g. junit-frames.xsl. You can get more control by using the XSLT task instead of report, but I found that the class path and factory control attributes did not work. I ended up having to use a java task with xalan.jar on the classpath, and feed it the -IN, -XSL command line arguments.
This allowed me to process with our latest available version of xalan, which doesn't suffer from the bug. However, now the redirect:write extension and the Ant StringUtils.replace method did not work. I looked through Xalan's documentation to find out how to set up namespaces, and used the xalan:component and xalan:script tags to get the redirect extension and my own replacement for string replace working. Now I no longer get false positives for build failures!
Thursday, October 28, 2010
More Movie News
Movie info summary:
This is the official website. After Nov 15 you can buy tickets to the advanced screening.
www.woodyiswatching.com
This is the link to demand Black Hills in your area. You can put in your own zip code.
http://eventful.com/performers/black-hills-/P0-001-000239209-2/top-demands?tbc
Rough teaser trailer: The official one should be released around November 15th.
http://www.youtube.com/watch?v=43ix1eM1YXU
DVDs will be released at a future date based on how many theatres pick up the film. I make a percentage on all of the copies I sell. So you can either tell me you want one and I will buy them in bulk to distribute (like taking orders) or you will be able to buy it yourself and mention my name. More info to follow as I have it.
Friday, October 15, 2010
See me get killed!
Not programming related, but I just wanted to share this. Recently my wife was given a role in the upcoming horror film Black Hills (aka Woody). At the last minute, they needed someone to fill in for a role, and they asked me to come be a victim. Filming was awesome! Please click the below link to request a showing of Black Hills / Woody in your area.
Friday, September 10, 2010
Why I like Blender, and Ubuntu, but not together
This will hopefully serve as a cautionary tale to any budding 3D animators out there hoping to produce something on Linux.
I had upgraded to Ubuntu 10.4 (Karmic Koala) when it was released, having skipped a few releases. I think I had previously been using Intrepid. Anyway, when I finally got around to trying Blender in the new Ubuntu, I found that the popup menus did not work properly. The textbox inputs didn't usually work correctly either. Sometimes I could get a popup to appear by clicking a menu, moving the mouse, and waiting for the menu to appear. Sometimes I could click on a text box, type blindly into the empty box, press an arrow key to change the Frame of the timeline, and changing frames would cause the text box to repaint and show my text. It was pretty awful.
I went searching for a solution on the nets, and found this:
Now, granted Blender 2.5 is still in beta. But I just downloaded the 2.53 build, and so far I'm impressed. If you had the same problem that I did, or just want to see the slick new UI, I suggest you grab it and try it out. I had nearly forgotten how to download and unzip software, having been spoiled by Apt for so long in Linux Land. Being able to bring down a built-in menu of available software is still one of my main reasons for switching, so I'll be extra excited when Blender 2.5 is available there.
I had upgraded to Ubuntu 10.4 (Karmic Koala) when it was released, having skipped a few releases. I think I had previously been using Intrepid. Anyway, when I finally got around to trying Blender in the new Ubuntu, I found that the popup menus did not work properly. The textbox inputs didn't usually work correctly either. Sometimes I could get a popup to appear by clicking a menu, moving the mouse, and waiting for the menu to appear. Sometimes I could click on a text box, type blindly into the empty box, press an arrow key to change the Frame of the timeline, and changing frames would cause the text box to repaint and show my text. It was pretty awful.
I went searching for a solution on the nets, and found this:
Blender 2.49 still had front-buffer drawing code that poses problems for some cards and drivers...
Blender 2.5 has a different drawing approach in that everything is now drawn in backbuffer.
Now, granted Blender 2.5 is still in beta. But I just downloaded the 2.53 build, and so far I'm impressed. If you had the same problem that I did, or just want to see the slick new UI, I suggest you grab it and try it out. I had nearly forgotten how to download and unzip software, having been spoiled by Apt for so long in Linux Land. Being able to bring down a built-in menu of available software is still one of my main reasons for switching, so I'll be extra excited when Blender 2.5 is available there.
Friday, November 13, 2009
Super Simple Character Animation - MMOG Development Tutorial
I still can't get over how much Blender's Game Engine rocks for allowing users to easily make games. I've been reading The Blender Gamekit: Interactive 3D for Artists as time allows, and learning some of the basics.
One common theme that I've noticed among Blender tutorials and the Gamekit book is that character animation takes a long time. The Gamekit devotes about 20 pages to describing how to rig an armature (bone structure) to a human model, and then use keyframe animation to create a walk cycle by moving the bones into the necessary positions. Other tutorials follow this model, but usually begin by devoting a whole "Phase One" wherein they explain first how to create the actual human model. The whole process can take a few hours to walk through.
In my eternal quest to achieve a quicker flash-to-bang ratio, I came up with a new idea: reduce the time needed to create an animated, walking human, by creating something other than a human.
Slimey Sam is a Gelatinous Cube monster (go dig out your Dungeons & Dragons book for reference). As such, he has a much simpler body to model, and an extremely simple, 2-bone armature. Blender even gets you part-way there by giving you his cube body. So let's get started:
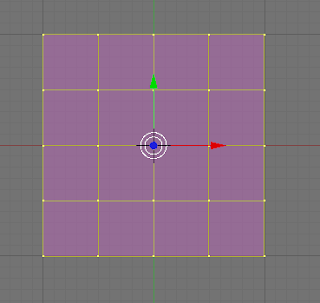
First, either start Blender, or create a new file if Blender is already running. You'll see that the default view adds a Cube object at the X,Y,Z origin point, and it's selected. Press the Z key to switch to Wireframe view, to make it easier to see the vertices of the cube. Press the Tab key to switch to Edit mode. Zoom in on the cube a bit, and then press the W key to pop up a menu of transformations, and select Subdivide (you can press 1 as a shortcut key). Do it a second time to add even more vertices.
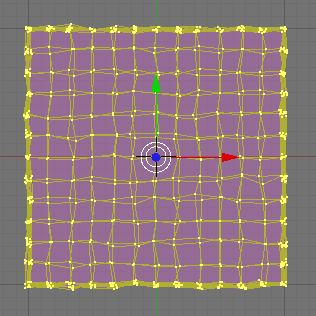
Now you'll want to subdivide a third time, but here I like to use the Fractal subdivide, that moves the vertices around a bit to make the form a little more interesting, instead of keeping it a perfect cube. Press W and pick the Subdivide Multi Fractal (3) option. The default options for Number of Cuts = 2, and Rand Fac = 10 works pretty well. Now you have:
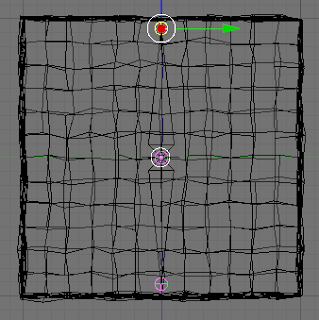
Zoom way in on the mis-shapen cube, press the Tab key to switch to Object mode, then the Numpad 3 key to switch to Side View, then press the Space key, and pick Add, Armature. The new Armature becomes selected with one bone, going from the center of the cube up to the top-center. Press Tab again to switch back to Edit mode. Click the bottom base point of the bone to select it, then press the E key to extrude a new bone from it. Press the Z key to restrict the mouse to the Z-axis, then move the mouse down until it's just above the bottom of the cube, to keep the bone inside. Then click the top point of the top bone to select it, press the G key to grab and move it, then press the Z key, and move the mouse down until it's just below the top of the cube, to keep the tip of the bone inside.
Now press Tab to switch back to Object mode. Press the A key to de-select everything. Right-click the cube, then hold shift and right-click the bones to add them to the selection. Press Control-P to pop up the Make Parent To menu, and choose the Armature option. Then on the Create Vertex Groups menu, choose Create From Bone Heat. This pairs up each vertex to its closest bone, and makes the vertices deform and follow the bones as they move.
Now, middle-click the border between the 3D view and the top menu, and choose the Split Area menu option. Move the mouse about halfway across the screen and click to split the screen vertically. In the right window, click the Window Type selector and choose Action Editor. The right window changes into a timeline view. In the left 3D window, press A to de-select all, then right-click the bones to select the Armature. In the right Action Editor, click the empty Up/Down arrow to the right of the Action Editor selector and choose Add New. Enter the name "Slide" in the box after the "AC:" text label. This will be the name of the action.
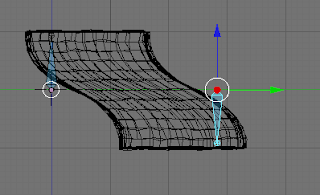
Back in the 3D window, press Control-Tab to enter Pose Mode. Press A to select all (both) bones. Now press the I key, and select the Rot menu option. Now right-click just the bottom bone to select it, press I and select the Loc option. This captures the Rotation of both bones, and the Location of the bottom bone, for this first keyframe. Now press the Up arrow key 3 times to advance to frame 31. Press the G key to move the bone, then the Y key to restrict movement to the Y (left-right in this Side view) axis, then move it to the right so that the bottom of the cube is stretched out like this:
Press the I key, and choose Loc to add a Location marker to this new keyframe. If you press Shift-Left arrow key to go back to frame 1, then Alt-A, it'll play the animation so far. Press Esc to stop playing. Now to make the bottom slide back into the resting position, move the mouse over the Action Editor window, press the B key to enter bound-select mode, and draw a box around the two keyframe dots for the bones in frame 1. Now click the button with the arrow pointing down into the orange line, which copies the keyframe to the buffer. Now press the Up arrow key six times to get to frame 61, then click the button with the arrow pointing up out of the orange line, to paste from the buffer. The 3D window should change from the slide position back to the resting position. You can press Shift-Left arrow to go back to frame 1, and Alt-A to play again. Now you'll see the cube slide to the right, then back to the left.
Middle-click the line separating the two windows way over to the right, and select Join Areas, then move to the right and click. This will get rid of the Action window now that you're done editing. In the button panel at the bottom, click the Pac-Man Logic Panel button (F4). Press Control-Tab to switch back to Object mode. The whole Armature should be selected. Add a Keyboard sensor that responds to the Right Arrow key, then add a controller, then two actuators: Motion, and Action. The Motion should be Simple Motion, with a 0.01 in the Loc: Y column. The action type should be Loop End, the AC: should be Slide, End on frame 61. Connect the keyboard sensor to the controller, and the controller to the two actuators. Click the Actor button so that the cube will become the "Player" object in your game. Mouse over the 3D window, and press the P key to start the game engine. Hold down the right arrow key to slide the cube to the right.
So as you can see, going from a static object that you can move around the screen, to one that has the appearance of animated movement, is pretty simple in Blender. And you didn't need to spend hours modeling a complicated humanoid and rigging its bones, in order to just see the necessary steps. The fully-rendered animation of the cube's walk cycle looks something like this:
One common theme that I've noticed among Blender tutorials and the Gamekit book is that character animation takes a long time. The Gamekit devotes about 20 pages to describing how to rig an armature (bone structure) to a human model, and then use keyframe animation to create a walk cycle by moving the bones into the necessary positions. Other tutorials follow this model, but usually begin by devoting a whole "Phase One" wherein they explain first how to create the actual human model. The whole process can take a few hours to walk through.
In my eternal quest to achieve a quicker flash-to-bang ratio, I came up with a new idea: reduce the time needed to create an animated, walking human, by creating something other than a human.
Meet Slimey Sam
Slimey Sam is a Gelatinous Cube monster (go dig out your Dungeons & Dragons book for reference). As such, he has a much simpler body to model, and an extremely simple, 2-bone armature. Blender even gets you part-way there by giving you his cube body. So let's get started:
First, either start Blender, or create a new file if Blender is already running. You'll see that the default view adds a Cube object at the X,Y,Z origin point, and it's selected. Press the Z key to switch to Wireframe view, to make it easier to see the vertices of the cube. Press the Tab key to switch to Edit mode. Zoom in on the cube a bit, and then press the W key to pop up a menu of transformations, and select Subdivide (you can press 1 as a shortcut key). Do it a second time to add even more vertices.

Now you'll want to subdivide a third time, but here I like to use the Fractal subdivide, that moves the vertices around a bit to make the form a little more interesting, instead of keeping it a perfect cube. Press W and pick the Subdivide Multi Fractal (3) option. The default options for Number of Cuts = 2, and Rand Fac = 10 works pretty well. Now you have:

Zoom way in on the mis-shapen cube, press the Tab key to switch to Object mode, then the Numpad 3 key to switch to Side View, then press the Space key, and pick Add, Armature. The new Armature becomes selected with one bone, going from the center of the cube up to the top-center. Press Tab again to switch back to Edit mode. Click the bottom base point of the bone to select it, then press the E key to extrude a new bone from it. Press the Z key to restrict the mouse to the Z-axis, then move the mouse down until it's just above the bottom of the cube, to keep the bone inside. Then click the top point of the top bone to select it, press the G key to grab and move it, then press the Z key, and move the mouse down until it's just below the top of the cube, to keep the tip of the bone inside.

Now press Tab to switch back to Object mode. Press the A key to de-select everything. Right-click the cube, then hold shift and right-click the bones to add them to the selection. Press Control-P to pop up the Make Parent To menu, and choose the Armature option. Then on the Create Vertex Groups menu, choose Create From Bone Heat. This pairs up each vertex to its closest bone, and makes the vertices deform and follow the bones as they move.
Now, middle-click the border between the 3D view and the top menu, and choose the Split Area menu option. Move the mouse about halfway across the screen and click to split the screen vertically. In the right window, click the Window Type selector and choose Action Editor. The right window changes into a timeline view. In the left 3D window, press A to de-select all, then right-click the bones to select the Armature. In the right Action Editor, click the empty Up/Down arrow to the right of the Action Editor selector and choose Add New. Enter the name "Slide" in the box after the "AC:" text label. This will be the name of the action.
Back in the 3D window, press Control-Tab to enter Pose Mode. Press A to select all (both) bones. Now press the I key, and select the Rot menu option. Now right-click just the bottom bone to select it, press I and select the Loc option. This captures the Rotation of both bones, and the Location of the bottom bone, for this first keyframe. Now press the Up arrow key 3 times to advance to frame 31. Press the G key to move the bone, then the Y key to restrict movement to the Y (left-right in this Side view) axis, then move it to the right so that the bottom of the cube is stretched out like this:

Press the I key, and choose Loc to add a Location marker to this new keyframe. If you press Shift-Left arrow key to go back to frame 1, then Alt-A, it'll play the animation so far. Press Esc to stop playing. Now to make the bottom slide back into the resting position, move the mouse over the Action Editor window, press the B key to enter bound-select mode, and draw a box around the two keyframe dots for the bones in frame 1. Now click the button with the arrow pointing down into the orange line, which copies the keyframe to the buffer. Now press the Up arrow key six times to get to frame 61, then click the button with the arrow pointing up out of the orange line, to paste from the buffer. The 3D window should change from the slide position back to the resting position. You can press Shift-Left arrow to go back to frame 1, and Alt-A to play again. Now you'll see the cube slide to the right, then back to the left.
Middle-click the line separating the two windows way over to the right, and select Join Areas, then move to the right and click. This will get rid of the Action window now that you're done editing. In the button panel at the bottom, click the Pac-Man Logic Panel button (F4). Press Control-Tab to switch back to Object mode. The whole Armature should be selected. Add a Keyboard sensor that responds to the Right Arrow key, then add a controller, then two actuators: Motion, and Action. The Motion should be Simple Motion, with a 0.01 in the Loc: Y column. The action type should be Loop End, the AC: should be Slide, End on frame 61. Connect the keyboard sensor to the controller, and the controller to the two actuators. Click the Actor button so that the cube will become the "Player" object in your game. Mouse over the 3D window, and press the P key to start the game engine. Hold down the right arrow key to slide the cube to the right.
So as you can see, going from a static object that you can move around the screen, to one that has the appearance of animated movement, is pretty simple in Blender. And you didn't need to spend hours modeling a complicated humanoid and rigging its bones, in order to just see the necessary steps. The fully-rendered animation of the cube's walk cycle looks something like this:
Thursday, October 8, 2009
MMOG Development Tutorial
If you've ever had an itch to program the next big Massively Multiplayer Online Game (or Virtual World, for those developing educational or scientific simulations), I'm here today to cut through some of the FUD, and tell you that the conventional wisdom about the genre being too difficult for a beginner to handle is a bit outdated. After doing some Googling around, I found that the most relevant articles indicated that the difficulty of mastering the low-level OpenGL programming required for hardware-accelerated 3D and 2D graphics, socket libraries and the select() I/O function for client-server network communication, persistent data storage and retrieval, physics simulation, memory management, object-oriented design, and game rules makes the whole endeavor a "stumble before you walk, walk before you run" experience for the newly-initiated developer. These barriers prevent many would-be amateur game developers from ever trying or getting very far along the path.
The good news is that a lot of these barriers of the Bad Old Days no longer apply. The accessibility of open source projects providing dynamic object oriented and functional programming languages, and libraries for graphics, networking, and all the other stuff that used to require tons of reinventing of the wheel for every project, makes it much easier to get started, and eventually produce prototypes and working products.
I know that seeing is believing, but I don't have much to show you today. Instead, I'll tell you about the first step of your journey, and whet your appetite for more.
First, go visit blender.org and download the latest version of the Blender open source 3D modelling, animation, game logic and physics engine GUI. Using Blender, it's possible to make some impressive standalone games, and there are also a few templates that allow for networked multiplayer games using sockets in custom Python scripts.
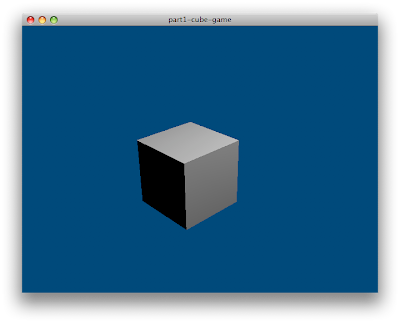
For now, we'll use Blender to create the simplest "hello world" game you've ever seen.
Start by opening Blender, and create a new file. The scene should automatically be populated with a cube, a light source, and a camera. Switch to the Camera view, and you'll see the cube from an angle, and a few faces of the cube will be visible all at once. Now, press the P key to run the Blender Game Engine. The editing interface with grid lines, menus and buttons disappears, and you see your cube floating in space. It looks pretty boring, but that's OK, because this is just a simple demonstration. Down the road, you'll be adding things to it like keyboard and mouse control, manipulation of AI-controlled objects, and physics. For the purposes of this demonstration, a simple non-interactive cube will suffice. Now, pull down the File menu, and select the "Save Game as Runtime" option. Save to an appropriately-named executable for your operating system (Windows users will want to append a .exe, etc). Now, go run your "game" and you should see something like this:
Imagine for a moment that your simple cube is actually a prototype or mock-up of a complex, immersive game, with lots of bells and whistles. All that you need to do in order to make it available for players to download and try out your game is to upload the executable (maybe zip up the .exe and all the copies of necessary .dlls, in Windows; Mac OS X users would probably make a disk image of the .app folder) to your web site. Thus, the distribution and installation problems are licked - they just download it, unpack it, and run it. For these prototypes and mock-ups, no fancy software installer or patcher/updater is needed.
And best of all, you didn't need to write a single line of code. How's that for novice-friendly?
I'll have more articles soon about some of the other concepts that I want to cover, and I'll update this post when more are available, and this will serve as a Table of Contents to link to the whole series.
Here are some links to tutorials about Blender, and its Game Engine:
The good news is that a lot of these barriers of the Bad Old Days no longer apply. The accessibility of open source projects providing dynamic object oriented and functional programming languages, and libraries for graphics, networking, and all the other stuff that used to require tons of reinventing of the wheel for every project, makes it much easier to get started, and eventually produce prototypes and working products.
I know that seeing is believing, but I don't have much to show you today. Instead, I'll tell you about the first step of your journey, and whet your appetite for more.
Getting Started with Blender
First, go visit blender.org and download the latest version of the Blender open source 3D modelling, animation, game logic and physics engine GUI. Using Blender, it's possible to make some impressive standalone games, and there are also a few templates that allow for networked multiplayer games using sockets in custom Python scripts.
For now, we'll use Blender to create the simplest "hello world" game you've ever seen.
Start by opening Blender, and create a new file. The scene should automatically be populated with a cube, a light source, and a camera. Switch to the Camera view, and you'll see the cube from an angle, and a few faces of the cube will be visible all at once. Now, press the P key to run the Blender Game Engine. The editing interface with grid lines, menus and buttons disappears, and you see your cube floating in space. It looks pretty boring, but that's OK, because this is just a simple demonstration. Down the road, you'll be adding things to it like keyboard and mouse control, manipulation of AI-controlled objects, and physics. For the purposes of this demonstration, a simple non-interactive cube will suffice. Now, pull down the File menu, and select the "Save Game as Runtime" option. Save to an appropriately-named executable for your operating system (Windows users will want to append a .exe, etc). Now, go run your "game" and you should see something like this:

Imagine for a moment that your simple cube is actually a prototype or mock-up of a complex, immersive game, with lots of bells and whistles. All that you need to do in order to make it available for players to download and try out your game is to upload the executable (maybe zip up the .exe and all the copies of necessary .dlls, in Windows; Mac OS X users would probably make a disk image of the .app folder) to your web site. Thus, the distribution and installation problems are licked - they just download it, unpack it, and run it. For these prototypes and mock-ups, no fancy software installer or patcher/updater is needed.
And best of all, you didn't need to write a single line of code. How's that for novice-friendly?
I'll have more articles soon about some of the other concepts that I want to cover, and I'll update this post when more are available, and this will serve as a Table of Contents to link to the whole series.
Other Noteworthy Links
Here are some links to tutorials about Blender, and its Game Engine:
- 25 Blender Tutorials - more info than you can shake a (noun) at
- Blender 3D: Noob to Pro on Wikibooks
- Blender wiki - Game Engine tutorial
Sunday, September 27, 2009
Thinking Functionally in XSLT
My current (almost done) project at work is a single-source publication pipeline using converting XML to XSL-FO with XSLT. I'm working with four other developers; one who sits next to me, two at a sister company down in Pittsburgh, who I've met with a couple times in the last year, and one more as a paid contractor at another remote site. We write stylesheets in Altova XML Spy, run transform operations in Saxon (good support for XSLT 2.0 features like xsl:for-each-group and XPath filters like select="* except title"), and feed the XSL-FO output into Antenna House for the XSL 1.1 support (standard change bars and retrieve-table-marker). Our distributed coding process demands a Software Configuration Management tool, and unfortunately corporate availability dictates that we use SourceSafe as opposed to something a little more useful like git or Mercurial.
One of the things I'm seeing the programmers on this project do (and I have to admit, I myself am guilty of setting up an early template like this) is to write XSLT code, which should be functional, the way one would write imperative procedural or object-oriented code. Code that reacts to matching an element, and then dives into a series of xsl:choose cases. Or a called-template that accepts a bunch of parameters. The problem with this is not readily apparent when writing one's own templates, but when others need to reuse or extend functionality, it becomes more obvious.
For example, in our case we divided up all of the (180-200) elements of our DTD by categories. One developer handles the bulk of the block-level and inline content, another handles the auto-generated and/or tabular-formatted front matter, I handle the inline and numbered tables, my buddy on-site does sequential lists, and the contractor does all of the graphics and extractable supplements. One of the first things that I added to the repository was a template that produced the static headers and footers, with classification markings, volume number and title, chapter/section type, number, and title, revision number and date, and page number format that would be followed by an fo:page-number (we didn't know about the XSL-FO 1.1 folio prefix/suffix features). All of these features were passed to the template as parameters. We all used this template repeatedly throughout our code, any time we had a high-level element that needed to produce a page-sequence. Now I'm kicking myself for writing it that way, because I have a big match template in my tables module that matches a bunch of types of tables, and calls the static content template just once in response to any of those table elements. Some of the parameters to the called-template are optional, but XSLT doesn't let me wrap an xsl:with-param tag inside a xsl:if or xsl:choose. You can do it the other way around, placing the conditional inside the param, but then you're passing something in rather than taking the param's default value. If I had instead written the template to apply moded match templates on the context node in the places where it referred to the params, we could all write the appropriate moded match templates in our modules. I could match my table elements with mode="revdate" for instance, and have it return the info appropriate to the particular element.
A similar thing happened when the one programmer doing the main content templates made one for the "title" element that produced a block for certain contexts, and did nothing as a default case. The rest of us having elements that contained a title could not just apply-templates to title and get a block output, because the default case would take over. We ended up having to output a block, and then possibly apply moded templates inside (in my case, tables can have multitle sheets, and a table's title outputs as "Table X. Title" but a sheet looks like "(Sheet X) Title" under the table title, so I make a match template for table/title and sheet/title).
Doing it functionally like that causes you to write more templates, but the advantage is that the templates are shorter, more shallowly nested, and more focused, making it easier to maintain because you can more easily tell the purpose of the shorter template and you don't get lost in a larger multi-screen template. I personally hate trying to debug something, jumping to a particular line or searching for text, and winding up in the middle of a multi-screen-long template and not knowing the name or match rule for the template that I found. It also makes the templates more extensible - for example, consider this as a template for titles:
<xsl:template match="title">
<fo:block font-weight="bold">
<xsl:apply-templates select="." mode="title"/>
</fo:block>
</xsl:template>
Pretty simple, right? By applying with a mode, we ensure that the default case will be to just apply-templates to its content nodes in the default mode. But if we were to override that by providing a moded match template, we can define specific behavior, and the mode gives us a nice hook to accomplish this. For instance, a table's title get the table number prefix, and it should be centered instead of left aligned, so:
<xsl:template match="table/title" mode="title">
<xsl:attribute name="text-align">center</xsl:attribute>
Table <xsl:value-of select="@label" />. <xsl:apply-templates />
</xsl:template>
The more hooks we give to other programmers, the more cohesive the entire project becomes. So although a functional language like XSLT can be more difficult for a programmer versed in Object Oriented or procedural scripting languages to wrap their head around concepts like pattern matching and recursion, the end result becomes much easier to read and understand, and therefore maintain.
Sunday, April 12, 2009
Back Online With GNU/Linux
It's been a few weeks since I've had a reliable PC to use at home. My PC running Windows XP had been on all night, until we had a brief power outage, and disk 2 of my RAID-0 array had a hardware failure. One of the bad blocks landed right on user32.dll, and I was unable to get the system back up and running. I figured that during the drive replacement, it was not only a good chance to finally switch over to a RAID-1 so that I wouldn't be down for so long next time a drive dies, but I also partitioned so that I could have a dedicated install of Ubuntu.
For the last year or two, I had been running Ubuntu inside VirtualBox in Windows. Although it was a decent setup, it lacked the ability to easily try some of the lower-level features like support for sound and other hardware. I had long been suggesting that people switch from Windows to Linux, but hadn't fully made the jump myself. I'm still working my way through my list of software and selecting free software alternatives, and I'll shortly post a list of some of the applications that I've found.
This was one of the best sights, and I'm glad that Wifi is finally getting good support on the Linux desktop.

Subscribe to:
Posts (Atom)

